Genesis : A developer's Portfolio starter kit
Hashnode APIs Hackathon 2024


This article & project is co-authored by Jyotishman Goswami & Devkant Swargiary
#APIHackathon
Introduction
Genesis as the name suggests "The origin or coming into being of something" is no-fuss way of developing the Portfolio website using the API's sourced from Hashnode and Github.
Create your developer's Portfolio in minutes using the starter kit.
Just connect the API's & PAT [Personal Access Token] and get started.
Inspiration
During the initial phase of the developer's journey, it becomes overwhelming to create projects, write technical articles and put all that together concisely in a developer's portfolio. In order to make the life of the developer easy, we have developed the Genesis project.
What problem does the it solves?
Our own experience of developing a Portfolio Website was a bitter sweet one. Initially, I had made the website using HTML & CSS. After learning Javascript, I implemented cool Javascript functions in my portfolio website. Later on, I had developed another portfolio website using React. And then, I created another portfolio projects using Nextjs. Eventually, I attempted another round using TypeScript and Nextjs. Catching the drift??? I guess every developer is guilty of inflicting endless misery on oneself by developing a Portfolio websites in different frameworks.
I believe that those times should have been spent judiciously on developing some cool Open Source Softwares or maybe some SAAS . Let bygones be bygones.
Technology Stacks used
TypeScript
Nextjs
TailwindCSS
Hashnode GraphQL API
Github Rest API
Connecting Hashnode GraphQL API
Create a .env file a the root of the directory and add the PAT: Personal Access Token
HASHNODE_URL=https://gql.hashnode.com
HASHNODE_TOKEN=<your token>

Deep dive into the codebase
Crux of the Project
Helper Directory - getAllUserInfo.ts
  import { gql, GraphQLClient } from "graphql-request";

  export async function getAllUserInfo(): Promise<any> {
    const query = gql`
    query Me {
      me {
        id
        username
        name
        profilePicture
        bio {
          markdown
          html
          text
        }
        profilePicture
        socialMediaLinks {
          website
          github
          twitter
          instagram
          facebook
          stackoverflow
          linkedin
          youtube
        }
        badges {
          id
          name
          description
          image
          dateAssigned
          infoURL
          suppressed
        }
        followersCount
        followingsCount
        tagline
        dateJoined
        location
        availableFor
        tagsFollowing {
          id
          name
          slug
          logo
          tagline
          followersCount
          postsCount
        }
      }
    }
    `;

    const endpoint = process.env.HASHNODE_URL as string;
    const apiKey = process.env.HASHNODE_TOKEN as string;

    const graphQLClient: GraphQLClient = new GraphQLClient(endpoint, {
      headers: {
        authorization: `Bearer ${apiKey}`,
      },
    });

    return graphQLClient.request(query);
  }
The above code defines a function that fetches user information from the Hashnode GraphQL API using a GraphQL query and the "graphql-request" library. It utilizes environment variables for the Hashnode endpoint URL and API key, ensuring a level of security for sensitive information.
Let's breakdown the codes.
  query Me {
      me {
        id
        username
        name
        profilePicture
        bio {
          markdown
          html
          text
        }
        profilePicture
        socialMediaLinks {
          website
          github
          twitter
          instagram
          facebook
          stackoverflow
          linkedin
          youtube
        }
        badges {
          id
          name
          description
          image
          dateAssigned
          infoURL
          suppressed
        }
        followersCount
        followingsCount
        tagline
        dateJoined
        location
        availableFor
        tagsFollowing {
          id
          name
          slug
          logo
          tagline
          followersCount
          postsCount
        }
      }
    }
The query requests various user-related information from Hashnode, including user ID, username, name, profile picture, bio, social media links, badges, followers count, followings count, tagline, date joined, location, availability, and tagsFollowing.
  const endpoint = process.env.HASHNODE_URL as string;
  const apiKey = process.env.HASHNODE_TOKEN as string;

  const graphQLClient: GraphQLClient = new GraphQLClient(endpoint, {
    headers: {
      authorization: `Bearer ${apiKey}`,
    },
  });
The Hashnode GraphQL endpoint URL and API key are retrieved from environment variables (
process.env.HASHNODE_URLandprocess.env.HASHNODE_TOKEN).A
GraphQLClientinstance is created with the specified endpoint and authorization header containing the API key.
return graphQLClient.request(query);
The GraphQL request is made using the
requestmethod of theGraphQLClientinstance, passing the defined query.The function returns the result of the GraphQL request as a Promise.
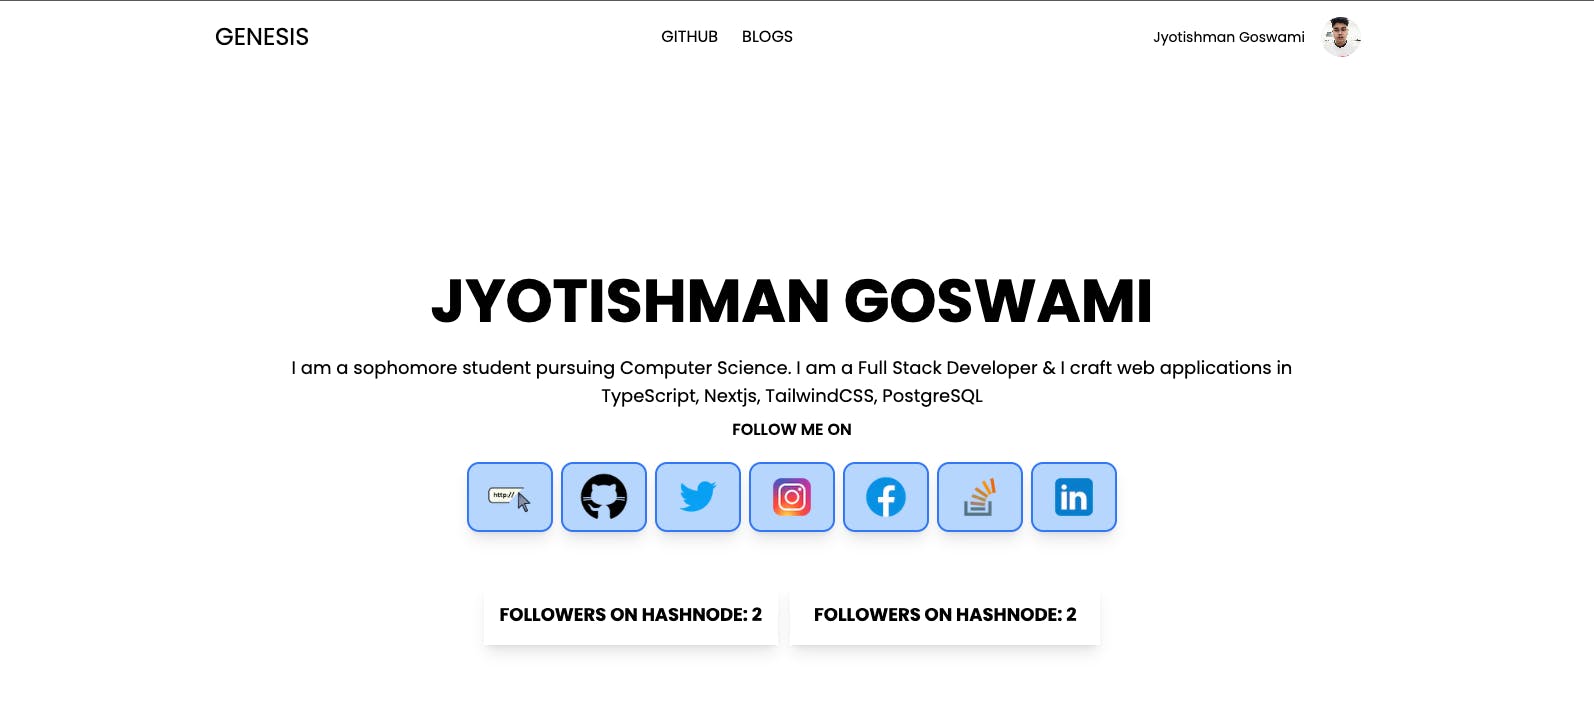
The data from the above getAllUserInfo.ts is displayed in the Hero Section of the website as show in the image below.
    <h1 className="font-bold sm:text-[60px] text-[35px] uppercase my-6 sm:my-2">
                {userData?.me?.name}
    </h1>
The above snippets of the code displays the user's name as fetched from the Hashnode GraphQL API.
<p className="text-lg sm:my-2 my-6">{userData?.me?.bio?.markdown}</p>
The paragraph tag fetches & displays the user's bio.
    <div className="sm:my-[2%]  my-[8%] flex flex-wrap gap-2 justify-center">
         {Object.keys(userData?.me?.socialMediaLinks).map((ele, index) => {
              const socialMediaLink = userData?.me?.socialMediaLinks[ele];
                return (
                  socialMediaLink &&
                  socialMediaLink.length > 0 && (
                    <div key={index}>
                      <div className="bg-blue-200 rounded-xl border-2 border-blue-500 shadow-lg py-2 px-4 hover:scale-95 hover:bg-blue-400 ">
                        <Link href={userData?.me?.socialMediaLinks[ele]}>
                          <Image
                            src={`/${icons[ele]}`}
                            height={50}
                            width={50}
                            alt="icons"
                            priority
                          />
                        </Link>
                      </div>
                    </div>
                  )
                );
              })}
            </div>
The above JSX code maps over user social media links, displaying corresponding icons as clickable links in a stylized container.
     <div className="  flex flex-col sm:flex-row justify-center my-[4%] py-3 px-3 gap-3">

              <div className="shadow-lg py-4 px-4 text-center hover:bg-black hover:text-white">
                <div><span className="text-lg font-bold uppercase">Followers on Hashnode: </span>  <span className="text-lg font-bold uppercase">{userData?.me?.followersCount}</span></div>
              </div>

              <div className="shadow-lg py-4 px-6 text-center hover:bg-black hover:text-white">
                <div><span className="text-lg font-bold uppercase">Followers on Hashnode: </span>  <span className="text-lg font-bold uppercase">{userData?.me?.followersCount}</span></div>
              </div>

            </div>
This JSX code creates a flex container with two stylized boxes, displaying user followers count on Hashnode with hover effects.
Blog section
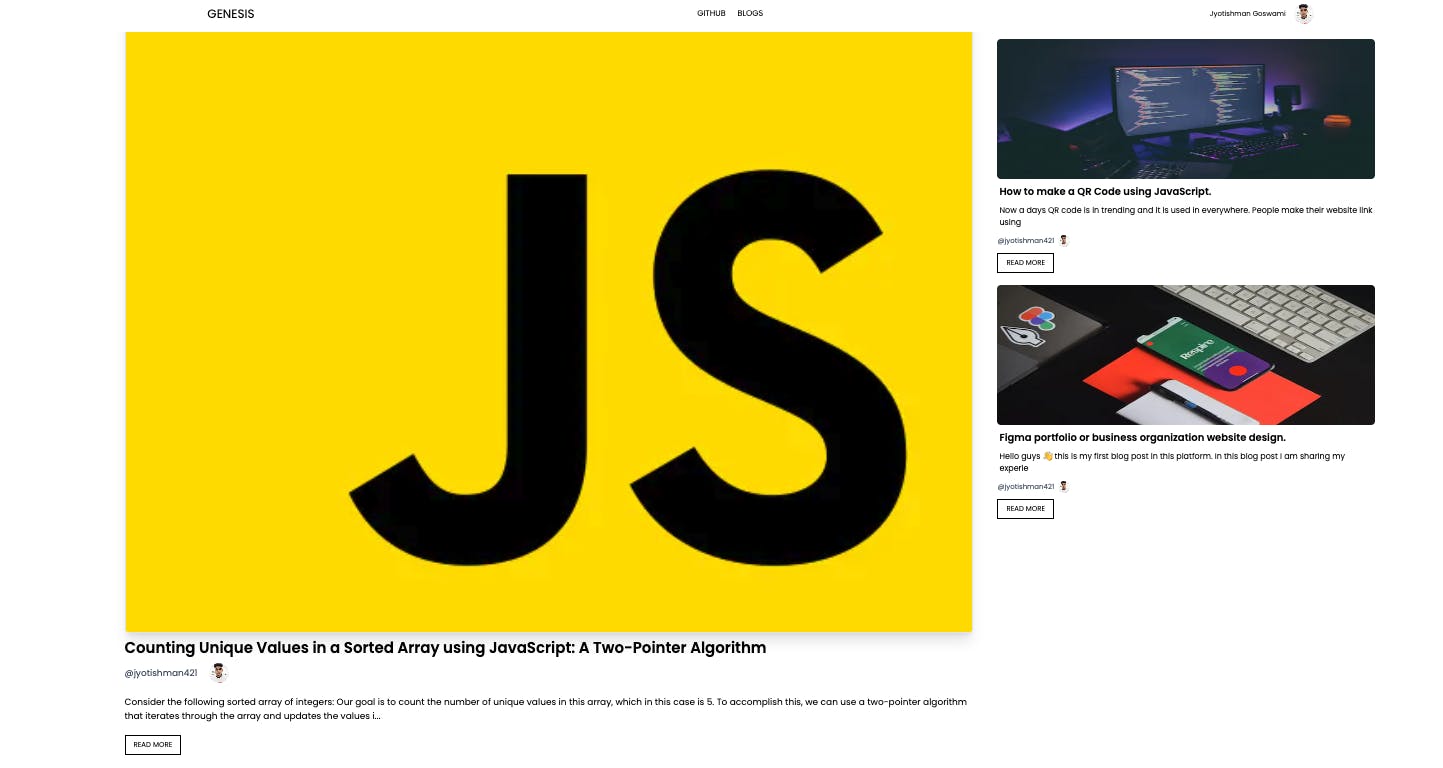
The code below is the GraphQL query from the helper/getPost.ts which fetches posts for user "jyotishman421" with id, username, name, profilePicture, and post details including title, brief, slug, and coverImage URL.
   query GetUserPosts  {
          user(username: "jyotishman421") {
            id
            username
            name
            profilePicture
            posts(page: 1, pageSize: 20) {
              edges {
                node {
                  title
                  brief
                  slug
                  id
                  coverImage{
                    url
                  }
                }
              }
            }
          }
        }
<div className='my-[5%]'> <div className='flex flex-col lg:flex-row w-full gap-2'> <div className=' basis-2/3'> <BlogSectionLeft username={username} profilePic={profilePicture} post={posts} /> </div> <div className=' my-6 lg:my-0 basis-1/3'> <BlogSectionRight username={username} profilePic={profilePicture} posts={newposts} /> </div> </div> </div>The above code is the snippets of BlogSection.tsx which display the username, profilePicture & post of a single Post in the left side & newposts in the right side.
Navbar
The code below displays the name & the profilePicture of the user in the Navbar
   <div className=" hidden sm:flex items-center">
       <div className="mx-2">
          <h2 className="text-sm">{userDetails?.me?.name}</h2>
        </div>
        <div className="mx-2">
          <Avatar
            alt={userDetails?.me?.name}
            src={userDetails?.me?.profilePicture}
          />
        </div>
      </div>
      <div className="sm:hidden">
        <MobileNav user={userDetails} />
      </div>
Blog Page
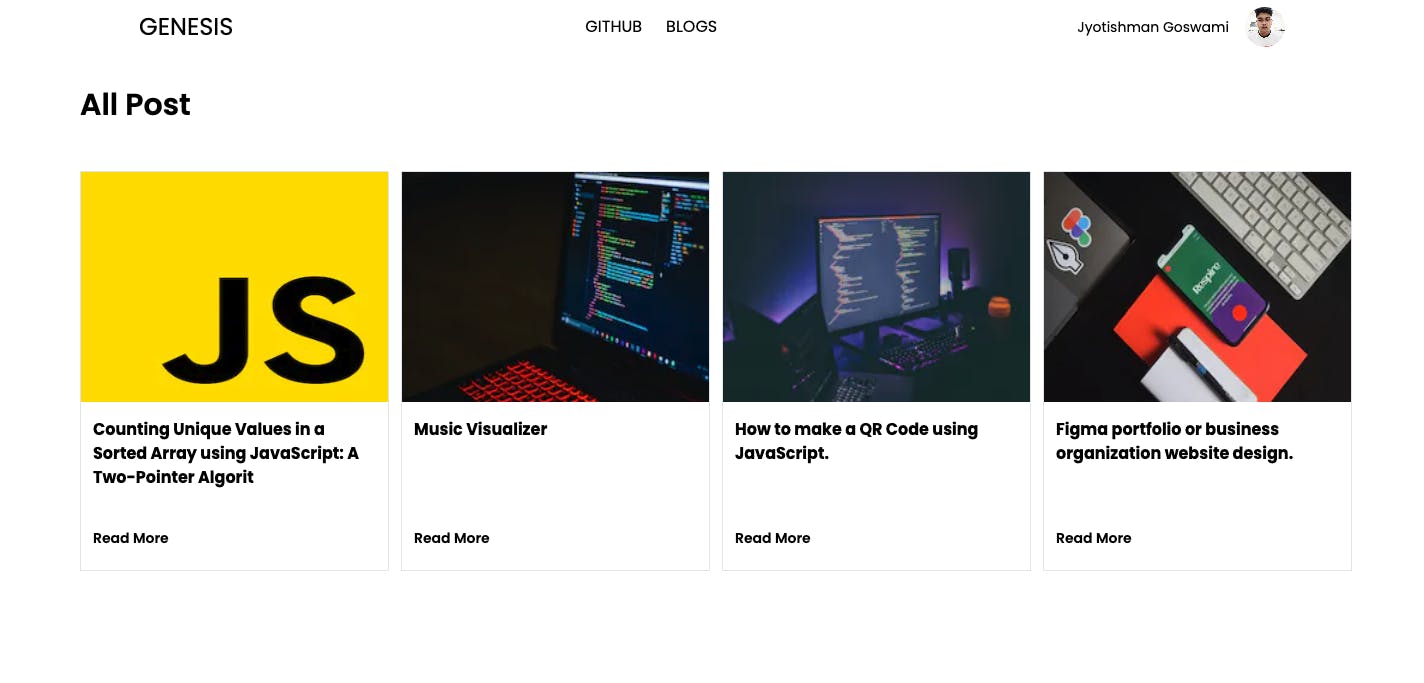
The image shown above is of the Blog page which could be navigated through the Navbar.
import React from "react";
import Image from "next/image";
import Link from "next/link";

interface BlogCardProps {
  posts: {
    node: {
      coverImage: {
        url: string;
      };
      title: string;
      id: string;
    };
  };
}

const BlogCard: React.FC<BlogCardProps> = ({ posts }) => {
  const image =
    "https://img.freepik.com/free-vector/laptop-with-program-code-isometric-icon-software-development-programming-applications-dark-neon_39422-971.jpg?";

  return (
    <div className="border min-h-[400px] max-h-[400px]  relative">
      <div>
        <Image
          src={posts?.node?.coverImage?.url || image}
          alt="coverImage"
          height={200}
          width={200}
          className="w-full sm:h-[160px] h-[200px] 2xl:h-[230px]"
          priority
        />
      </div>
      <div className="my-2 px-3 py-2 text-md font-bold">
        <h2>{posts?.node?.title.slice(0, 80)}</h2>
      </div>

      <div className="px-3 absolute bottom-5">
        <Link href={`/post/${posts?.node?.id}`}>
          <button className="text-sm font-semibold">Read More</button>
        </Link>
      </div>
    </div>
  );
};

export default BlogCard;
The BlogCard component in React displays a blog card with a cover image, truncated title, and a "Read More" button. It receives blog post data as props, extracts the necessary information, and dynamically renders the cover image, title, and a link to the full blog post using Next.js routing.
query Post {
      post(id: "${id}") {
         id
         slug
         title
         author{
           name
           username
           profilePicture
        }
         coverImage{
          url
        }
        content{
           html
        }
      }
    }
GraphQL query above fetches post details using an ID variable. It also includes post info like ID, slug, title, author details, cover image URL, and HTML content.
Bonus Feature : Github API integration
A developer's portfolio is incomplete without reflecting Github repositories. Github repositories serves as a proof of work for the developer.
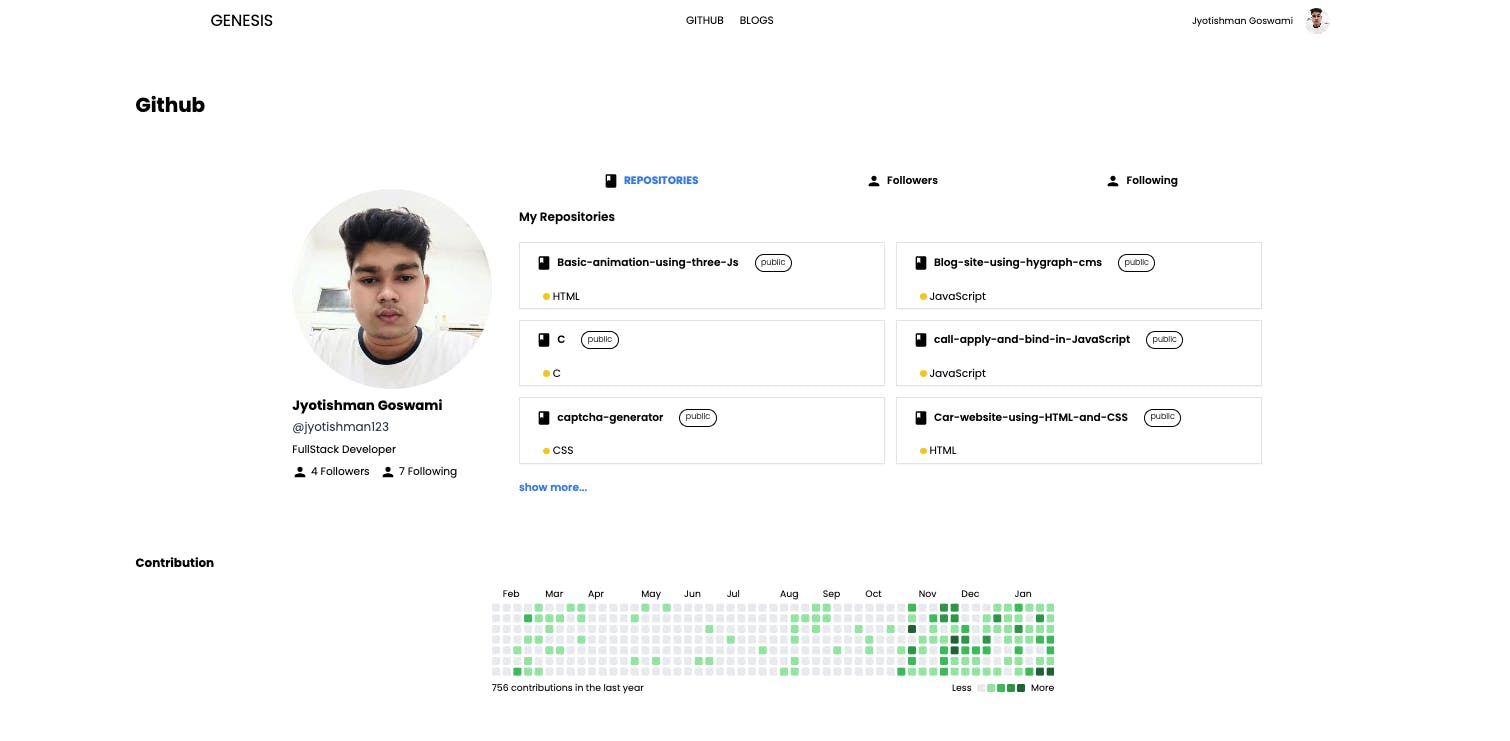
To achieve the above page we had to call the Github API and write the following codes to achieve it.
In the helper/getGithubApi.ts ,
getGithubUserDetails function fetches the details of the users
getUserGithubRepo function fetches the Github repository of the users and has pagination implemented by showing only 6 repositories.
getUserFollowers function fetches the followers of the users.
getUsersFollowing function fetches the Github accounts followed by the users.
export const getGitubUserDetails = async () =>{
      return fetch('https://api.github.com/users/jyotishman123')
}

export const getUserGithubRepo = async () =>{
      return fetch('https://api.github.com/users/jyotishman123/repos?page=1&per_page=6')
}

export const getUserFollowers = async () => {
      return fetch('https://api.github.com/users/jyotishman123/followers')
}

export const getUsersFollowing = async () => {
       return fetch(`https://api.github.com/users/jyotishman123/following`)
}
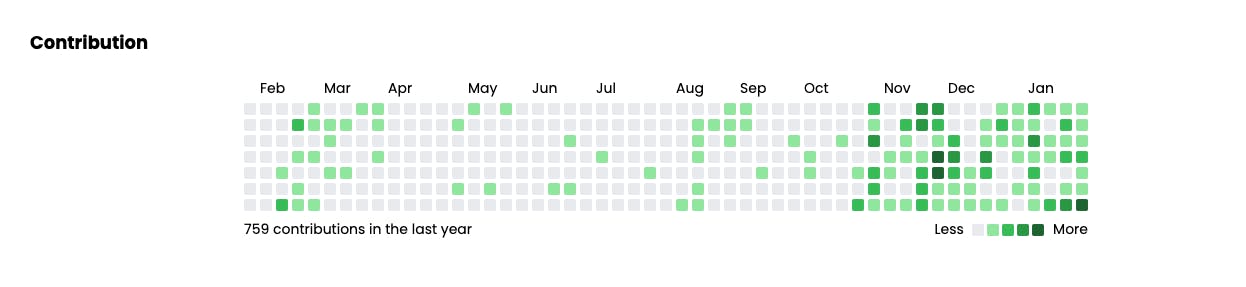
Now in app/Github/page.tsx, we see that we have implemented GithubCalendar component and it shows the Github green squares contribution graph using my username="jyotishman123".
 <div className='py-2'>
     <h5 className='my-6 text-lg font-bold'>Contribution</h5>
     <div className='flex justify-center '>
        <GitHubCalendar username="jyotishman123" colorScheme='light' />
     </div>
 </div>
Conclusion
We have released the project as Open Sourced. We hope you'll find it useful. Feel free to report bugs, add new features and use it as your Developer Portfolio website. It would be an honour for us.
We would like to thank Hashnode for this opportunity and it was fun playing with the API.
Thanks for reading.